
Step-by-Step Guide to Installing a Wire Mesh Basket for Cable Management
Posted on: 06/06/2025

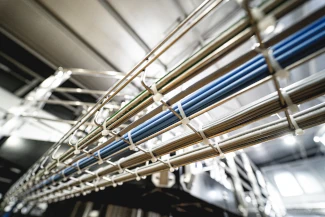
Why Choose a Wire Mesh Basket Tray?
There’s a reason wire mesh basket trays are a top pick in cable management systems: flexibility.
These trays can be cut, bent, and shaped to suit any cable routing scenario, from simple straight runs to complex turns with tray bends and risers.
They're available in various finishes too, including:
Galvanised wire mesh tray for corrosion resistance in general indoor use
Stainless steel cable tray ideal for harsh or humid environments
Powder coated cable tray for visual integration or additional protection
And if you're dealing with high-traffic or industrial zones, a heavy-duty cable tray version provides added strength and durability.
Step-by-Step Installation Guide
Plan Your Layout
Before you even pick up a screwdriver, walk through the space. Identify:
The route your cables will take
Any obstructions or areas needing bends or risers
Points where you'll need cable tray covers or tray dividers for separation
Having a layout drawing helps and saves you from a mid-install "why is there a beam here?" moment.
Install the Support Brackets
Spacing matters. Generally, support brackets should be placed every 1.5 to 2 meters depending on tray weight and cable load.
Wall brackets for vertical runs
Ceiling-mounted brackets for overhead trays
Floor-mounted stands for raised installations
Ensure brackets are level and secure, no one wants a wonky tray holding expensive network cables.
Use bolt cutters or a tray cutter to size your wire cable basket. Smooth out sharp edges with a file to avoid cable damage.
Need a bend? Create one manually or use prefabricated tray bends and risers for clean, professional turns.
Once cut to size and prepared, place the tray into the brackets. Secure with the appropriate fasteners. Check alignment before tightening your future self will thank you.
This is where you fine-tune:
Tray dividers: Keep data and power lines apart
Cable tray covers: Add protection in sensitive or messy environments
Earth bonding: If required, make sure trays are properly grounded
Route cables according to type, load, and accessibility. Label as you go for easy maintenance later. And remember, less cable chaos means fewer migraines down the line.
Ceiling-mounted brackets for overhead trays
Floor-mounted stands for raised installations
Ensure brackets are level and secure, no one wants a wonky tray holding expensive network cables.
Cut and Prepare the Tray
Use bolt cutters or a tray cutter to size your wire cable basket. Smooth out sharp edges with a file to avoid cable damage.
Need a bend? Create one manually or use prefabricated tray bends and risers for clean, professional turns.
Position and Fix the Tray
Once cut to size and prepared, place the tray into the brackets. Secure with the appropriate fasteners. Check alignment before tightening your future self will thank you.
Add the Accessories
This is where you fine-tune:
Tray dividers: Keep data and power lines apart
Cable tray covers: Add protection in sensitive or messy environments
Earth bonding: If required, make sure trays are properly grounded
Lay the Cables
Route cables according to type, load, and accessibility. Label as you go for easy maintenance later. And remember, less cable chaos means fewer migraines down the line.


FAQs
Can I install wire mesh basket trays outdoors?
Yes but opt for stainless steel cable trays or those with a weather resistant powder coating for outdoor durability.
What type of tray do I need for high-load areas?
A heavy duty cable tray is your best bet built for strength and long-lasting support.
Do I need special tools to cut the trays?
Nope. Bolt cutters or a hacksaw will do, though tray cutters make the job cleaner and faster.
How often should I use support brackets?
Every 1.5 to 2 meters is standard. Heavier cable loads may require closer spacing.
Can I mix different finishes in one installation?
It's not recommended. Mixing materials can lead to galvanic corrosion. Stick with one finish type throughout.
Final Thoughts
Whether you're wrangling CAT 6 or coaxial, a properly installed wire mesh basket tray keeps your cabling neat, accessible, and safe.
It also makes you look like you know exactly what you're doing, bonus points if the tray is straight on the first try. With a little planning and the right components, cable routing doesn't have to be a tangled nightmare.
Looking to impress your next client, or just make sense of your own cabling setup? Now’s the perfect time to roll up your sleeves and install a tray system that works smarter, not harder.
Related Products